

How To Turn On Grayscale On Procreate
Add a new layer on top of your original artwork. Fill it with any shade of gray from the colour bicycle by dragging and dropping it onto your canvas. Accommodate the new layer's blend mode to Hue past tapping on the N to the right of the layer's thumbnail.
I'm Carolyn and I've been using Procreate for over three years to run my digital illustration business. Being well-versed in color theory is a key function of what makes me an experienced Procreate artist and it is an essential part of my art do when it comes to using the app.
At that place are many reasons that users will demand to view or create their work in Procreate in grayscale. And lucky for united states, Procreate offers a couple of dissimilar means in which users can practise this and they're non as complex every bit y'all may think.
In this tutorial, I'm going to evidence y'all how to change the color mode to grayscale and draw in grayscale in Procreate.
Note: Screenshots are taken from Procreate on iPadOS fifteen.5.
Table of Contents
- Key Takeaways
- How to View Artwork in Grayscale in Procreate
- How to Depict in Grayscale in Procreate
- Reasons for Using Grayscale in Procreate
- Color Values
- Blackness & White Event
- Shading
- FAQs
- How to get Procreate out of grayscale?
- Are there gratuitous Procreate grayscale palettes?
- Why is Procreate in grayscale and how to fix information technology?
- Can I create a grayscale palette in Procreate Pocket?
- Final Thoughts
Fundamental Takeaways
- Y'all can view artwork in grayscale in Procreate by calculation a new gray layer on top of the original layers and adjusting its blending mode.
- You can draw in grayscale past creating a new grayscale color palette in your Color Wheel.
- This is a cracking style to identify your tonal values in artwork by eliminating the lark of colour.
- Grayscale is a quick manner to transform a colored image into a black-and-white or sepia artwork.
How to View Artwork in Grayscale in Procreate
This is the nearly efficient way to view your artwork in grayscale without affecting the values of your original color palette. Here'southward how:
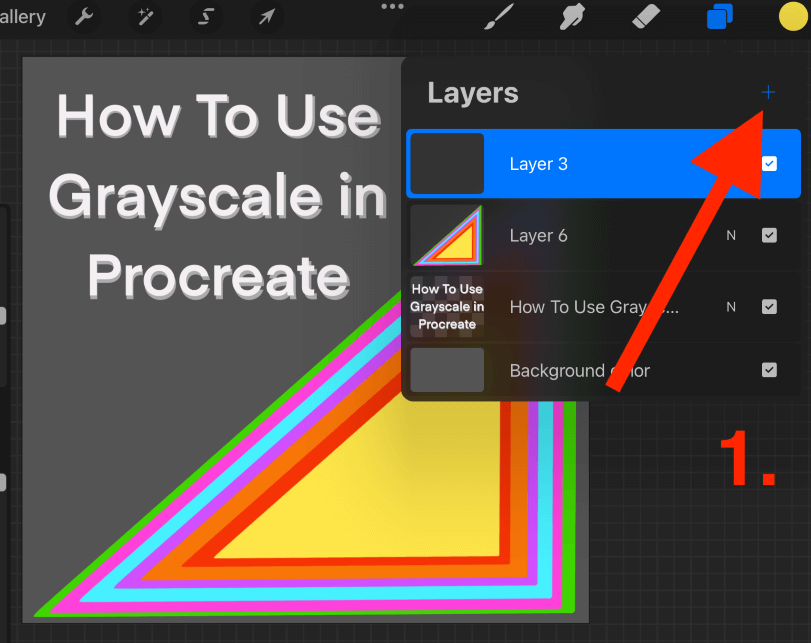
Step 1: Create a new layer on top of the layer you desire to view in grayscale. If yous desire to view the unabridged artwork in grayscale, add the layer at the very top of your layers menu. You can do this by tapping on the + symbol in your Layers menu.
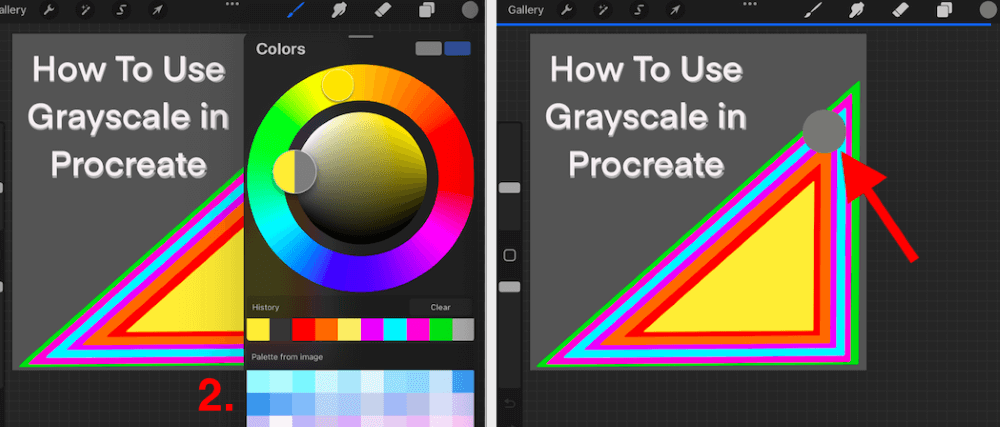
Step 2: Fill the new layer with whatever shade of grayness from your color bicycle by dragging and dropping it onto your canvas.
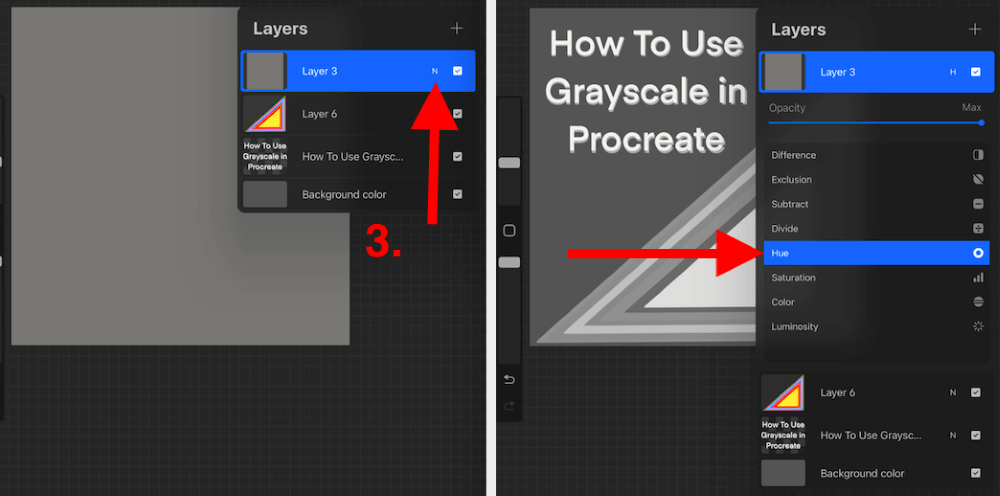
Step 3: Adjust the blending mode of your new layer by tapping on the N to the right of your Layers' championship. When the driblet-down menu appears, ringlet downwards and select the Hue option.
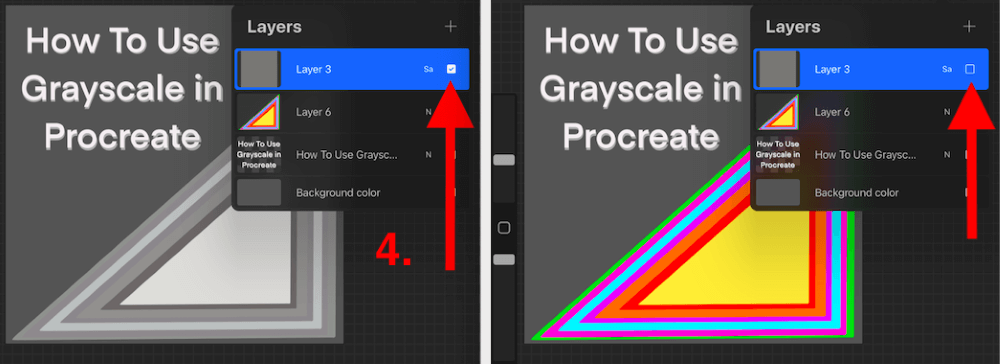
Step 4: You tin easily switch between grayscale and full color by tapping on the active grey layer to deactivate and activate information technology.
Pro Tip: When adjusting the blending way of your greyness layer, you can actually select Hue or Saturation. Both of these settings volition accept the aforementioned event on your canvass.
How to Draw in Grayscale in Procreate
You lot too take the option to create your ain digital artwork in grayscale from the very showtime and draw using a specific palette. You tin can do this past creating your own grayscale palette from an image.
All you demand to practice is notice a palette that you desire to use online and save information technology to your device. I did this by searching "grayscale palette" in Google images and saving the file to my images. Once you have washed this, it's time to go started. Here'southward how:
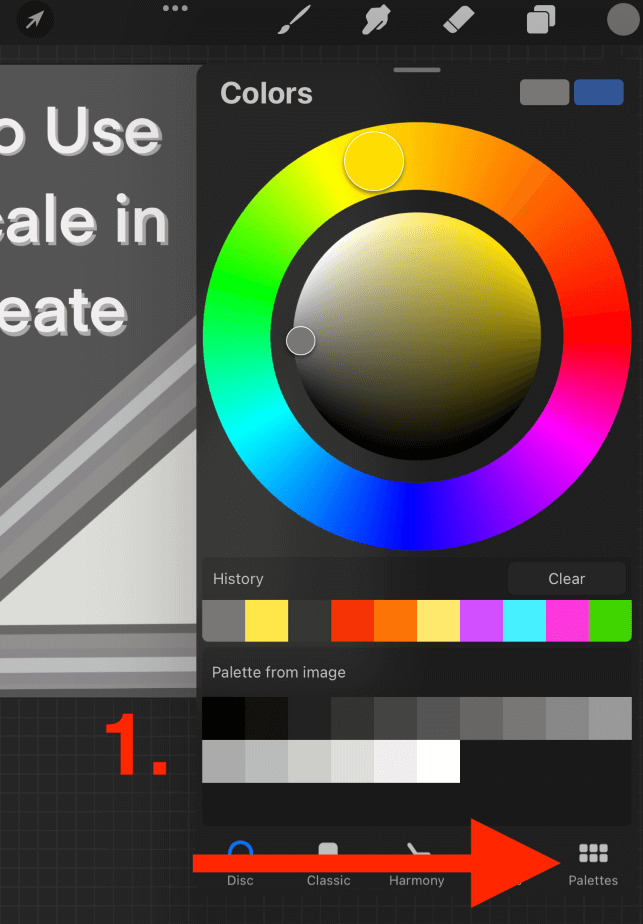
Step ane: Tap on the Color Disc in the meridian correct-hand corner of your canvas to open your Color Cycle. In the bottom of the window, whorl to the correct and select the Palette menu.
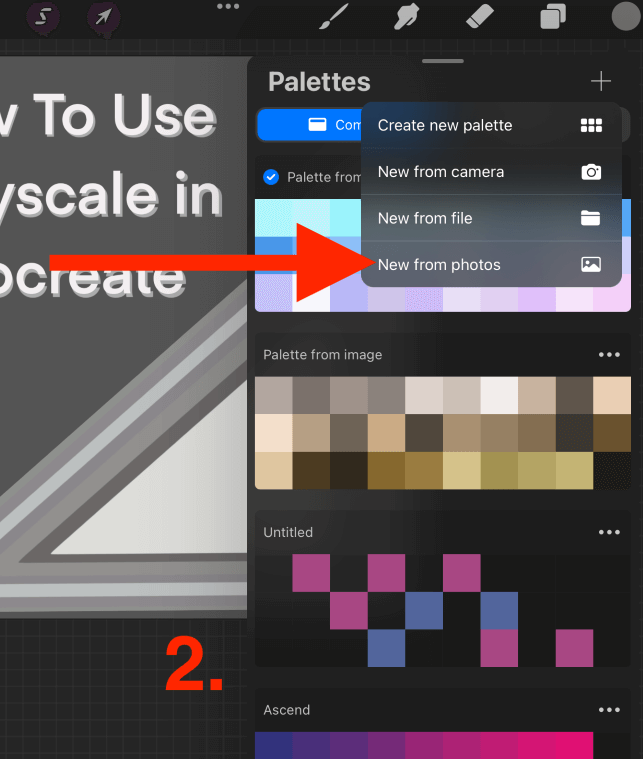
Footstep two: In the height right-hand corner of your Palettes carte du jour, tap on the + symbol. Then select New from photos.
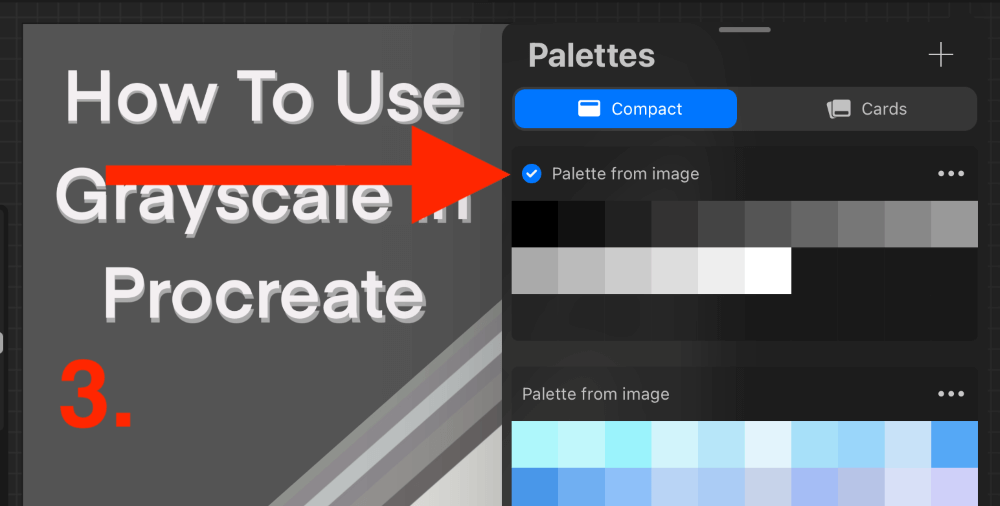
Stride three: Select your saved image and Procreate will automatically create a fresh new palette using all of the shades of color from the image. It will now be visible and active at the elevation of your Palettes menu. This volition remain in the Palettes bill of fare until you delete it.
Reasons for Using Grayscale in Procreate
There are a couple of reasons why artists similar to use grayscale in Procreate. I have highlighted them below. Some of the reasons you may not know nigh all the same may be useful for you. Here they are:
Colour Values
Many artists will like to view their artwork in grayscale to identify the color values of their artwork. This eliminates the focus on color which helps y'all to focus on tonal values over color values.
Black & White Result
If you are collaborating with a client and desire to produce various options for them, this is a quick mode to provide a blackness and white option for them.
Shading
Sometimes shading a colour artwork can be challenging for the man eye and viewing your work in grayscale can simplify the colors for yous making it easier to place tones in your work.
FAQs
I have gathered a choice of your often asked questions nigh using grayscale in Procreate. I take briefly answered them for you below:
How to get Procreate out of grayscale?
Information technology depends on how you lot got into grayscale in the first place. If you created a grayscale layer, but untick the grayness layer to deactivate it and your artwork will become back to normal.
Are there costless Procreate grayscale palettes?
You can purchase and download grayscale palettes online from other Procreate artists or you can create your own grayscale palette by downloading a palette you like online and adding it to your Color Wheel Palettes carte.
Why is Procreate in grayscale and how to set it?
If yous didn't manually add grayscale to your Procreate projection, you may take accidentally adapted the saturation of your layer. I recommend opening your Adjustments bill of fare (magic wand icon) and ensuring your Saturation levels are where they should be.
Can I create a grayscale palette in Procreate Pocket?
Yep! You can add together a grayscale layer and create a grayscale palette in Procreate Pocket using the same methods as shown above.
Final Thoughts
Every bit some of you lot may already know from my previous articles, I am very passionate most colour theory and I believe all digital artists should familiarize themselves with the color options available in the Procreate app. There are many so don't await to exist an expert immediately.
Using the grayscale settings available to you is the adjacent-level color theory in Procreate and I strongly believe it will upwardly your digital artwork game by spending some time to get used to information technology. You lot can create crawly new artwork and improve existing work by using these methods.
Do you use grayscale in the Procreate app and have anything to add? Feel complimentary to leave your feedback in the comments department below.
Source: https://www.softwarehow.com/use-grayscale-procreate/
0 Response to "How To Turn On Grayscale On Procreate"
Post a Comment